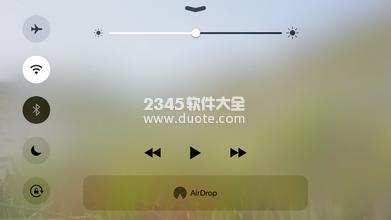
ЁЁЁЁУЋВЃСЇЦфЪЕОЭЪЧФЅЩАВЃСЇЃЌФмЙЛФЃК§ЕФПДЧхБГКѓЕФЗчОАЃЌШУШЫИаОѕгажжыќыЪУРЃЌШУНчУцПДЩЯШЅгааЉВуДЮИаЁЃ
ЁЁЁЁБШШчЃК

ЁЁЁЁИпДѓЩЯАЁЃЌНгЯТРДПЯЖЈЪЧблВіЪжбїЕФЙ§ГЬЁЃ
ЁЁЁЁЕБШЛЃЌгУpsИувЛИіШЋОАУЋВЃСЇБГОАКСЮовЩЮЪЪЧзюЪЁЪТЕФЃЌФЧНгЯТРДОЭУЛЩЖЪТПЩИЩСЫЁЃ
ЁЁЁЁЕБШЛno no noСЫЁЃ
ЁЁЁЁУЋВЃСЇЮовЩОЭЪЧжжФЃК§СЫЃЌЩйВЛСЫfilter blurЁЃ
ЁЁЁЁзюжеаЇЙћ(chrome)ЃКЬьЦјдЄБЈ
ЁЁЁЁрХЃЌвВЫуЪЧНЋОЭСЫЁЃ
word-wrap: break-word; background-image: none !important; position: static !important; padding: 0px !important; line-height: 1.1em !important; outline-style: none !important; outline-width: 0px !important; width: auto !important; bottom: auto !important; float: none !important; height: auto !important; font-size: 10pt !important; vertical-align: baseline !important; top: auto !important; right: auto !important; left: auto !important;">1 |
<div class="container"> |
2 | <div class="frosted-glass"></div> |
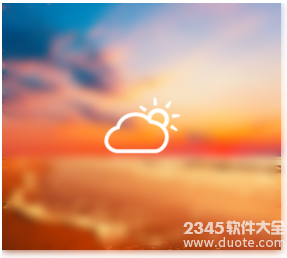
3 | <img class="weather" src=";> |
ЁЁЁЁЯШИувЛИіdivзїЮЊШнЦїВуЃЌгУРДЗХжУЗчОАБГОАЭМЁЃ
ЁЁЁЁФкВПЗХвЛИіdivЃЌзїЮЊУЋВЃСЇЕФжїЬхЁЃ
ЁЁЁЁдйЗХвЛИіimgЃЌЯдЪОЬьЦјЭМБъЁЃ
ЁЁЁЁШнЦїВуЃК
ЁЁЁЁДѓаЁЪЧЭМЦЌДѓаЁЃЌАбЗчОАЭМзїЮЊБГОАЯдЪОЃЌno-repeatЁЃетРягУЕНвЛИіаЁММЧЩЃЌНЋbackground-attachmentЩшГЩfixedЃЌВЛЫцдЊЫиЙіЖЏЃЌШУзгдЊЫиМЬГаСЫБОВуЕФБГОАКѓЃЌзгдЊЫиОЭБфГЩСЫвЛИіviewportЃЌвЦЕНФФЖљОЭПДЕНБГОАЕФФФЖљЁЃЁЃЁЃЖюЁЃЁЃЁЃетОфЛАРэНтЦ№РДгаЕуРЇФбЃЌТыХЉШБЗІгябдБэДявВЪЧвЛДѓПрФеЁЃ
4 | background-image:
url(background.png); |
5 | background-repeat: no-repeat; |
6 | background-attachment: fixed; |
ЁЁЁЁУЋВЃСЇВуЃК
ЁЁЁЁетРяЕФЙиМќММЧЩОЭЪЧbackground:inheritЃЌжБНгЪЙгУСЫИИдЊЫиЕФБГОАЃЌКЭИИМЖЕФbackground-attachment:fixedПЩЭъГЩДгЯрЛњПДЪРНчЕФИїжжХЃБЦаЇЙћЁЃ
ЁЁЁЁБОЮФЕФЕФУЋВЃСЇЪЧШЋОАЃЌЕБШЛПЩвдЩЯАыВПЛђепЯТАыВПЃЌЛђепЦфЫћЮЛжУЃЌетОЭПДГіinheritКЭfixedХЃБЦЕФЕиЗНСЫЁЃ
05 | -webkit-filter: blur(5px); |
06 | -moz-filter: blur(5px); |
07 | -ms-filter: blur(5px); |
10 | filter: progid:DXImageTransform.Microsoft.Blur(PixelRadius=4,
MakeShadow=false); |
ЁЁЁЁЩЯУцЕФИїжжfilterЮЊСЫМцШнИїжжфЏРРЦїАцБОЃЌПЩЖШФяПЩЙШИшЃЌЫцБуРВЁЃ
ЁЁЁЁie6~9ЕФОЭгУfilter: progid:DXImageTransform.Microsoft.Blur(PixelRadius=4,
MakeShadow=false)НјааМцШнЁЃ
ЁЁЁЁie8ЯТЕФаЇЙћЃЌМЬајНЋОЭАЩЁЃ
ЁЁЁЁзюКѓОЭЪЧЬьЦјЭМБъЃК

ЁЁЁЁашвЊАбЭМБъИЁдкзюЩЯВуФГИіЮЛжУЩЯЃЌИіШЫВЛЬЋЯВЛЖЪЙгУЗЩдкЬьЩЯЕФabsoluteРДНтОіШЫМфЕФЫзЪРЮЪЬтЃЌдЊЫиФкЕФЖЈЮЛгУmarginРДзїОЭзуЙЛСЫЃЌЫфШЛЛсдквГУцЕФЛиСїЩЯгагАЯьЃЌЕЋВЛЛсВњЩњзуЙЛЕФгАЯьЃЌКУДІОЭЪЧИИдЊЫиЕФЮЛжУКЭДѓаЁЕФБфЖЏВњЩњКѓвХжЂЛсОЁПЩФмаЁЃЌШУabsoluteРДХЊЃЌФЧОЭЭЗДѓСЫЃЌШЫМфЕФЮЪЬтОЭШУШЫМфЕФРДНтОіАЩЁЃ
ЁЁЁЁЭМБъЕФpositionЩшГЩrelativeЃЌЪЧЮЊСЫШУЫќИЁдкзюЩЯУцЃЌвђЮЊrelativeЕФвЊБШФЌШЯstaticЕФЯдЪОВуМЖИпЁЃ
ЁЁЁЁЖЈЮЛОЭгУmarginРДзіЃЌЕБШЛЧАЬсЪЧвЊАбЫќХЊГЩblockМЖдЊЫиЃЌЗёдђОЭШЛВЂТбСЫЁЃ
ЁЁЁЁжСДЫЭъГЩЛљБОаЇЙћЁЃ
ЮФеТФкШнРДдДгкЭјТчЃЌВЛДњБэБОеОСЂГЁЃЌШєЧжЗИЕНФњЕФШЈвцЃЌПЩСЊЯЕЮвУЧЩОГ§ЁЃЃЈБОеОЮЊЗЧгЏРћаджЪЭјеОЃЉ СЊЯЕгЪЯфЃКrjfawu@163.com


 ЯрЙиЙЅТд
 НќЦкШШЕу
 зюаТЙЅТд